

How To
4) Cleaning / Etching a Benitoite Specimen
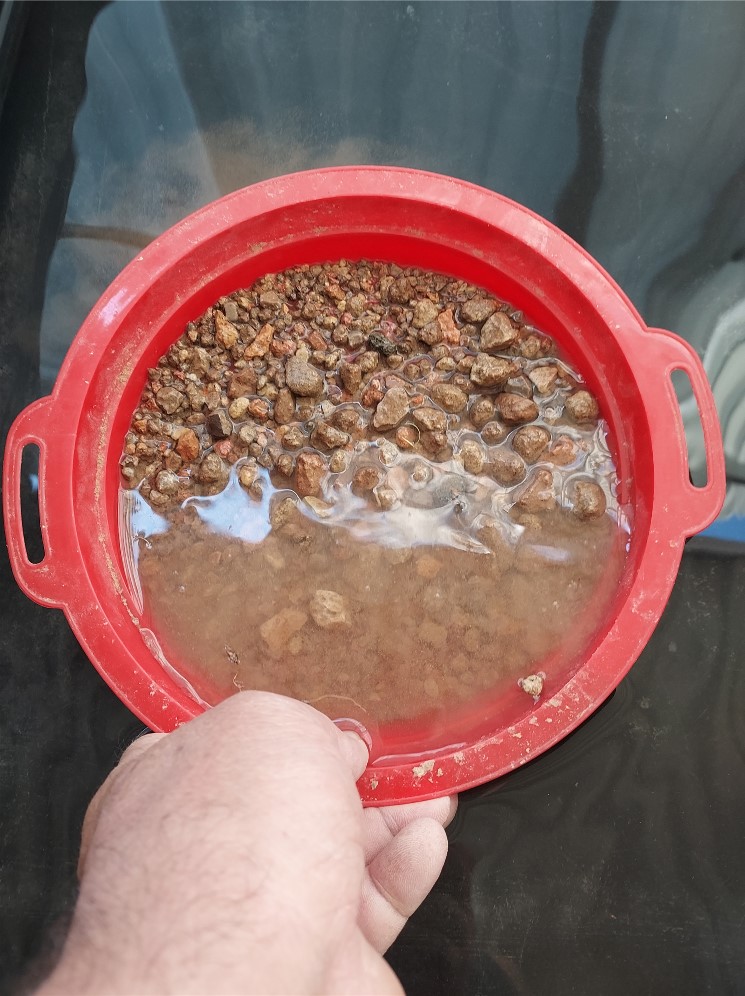
1) How to Search your Montana Sapphire Gravel
Finding the Sapphire in your gravel is not hard at all as long as you follow a few simple rules.
 *Always try to do your searching in bright sunlight. The natural sunlight make the sapphire really sparkle and much easier to spot than with indoor lighting.
*Never wear sunglasses while searching for your sapphire, just shade your eyes if needed. Sunglasses reduce the glare and sparkle that will be emitted by the rough sapphire, making them very difficult to locate amongst the gravel.
*Keep the gravel wet. Especially on hot days, the water used to wash the gravel will evaporate quickly reducing the sparkle of the Sapphire. If your gravel starts to look dry, give it a quick spray with a spray bottle of water.
*Search the gravel a second, or even a third time. Once finished with the gravel in front of you, keep it to go thru it again. Even an experienced sapphire hunter can miss a stone or two. Never assume you have found all of the sapphire in that pile in front of you until you have checked it again.
Method #1
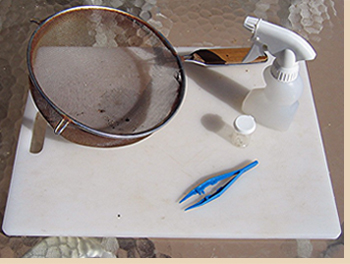
What you will need:
Tweezers
Spray Bottle
Vial or small baggie
Kitchen fine wire mesh strainer or washing screen
Search surface (we recommend something white in color, a plastic kitchen cutting board works perfectly)
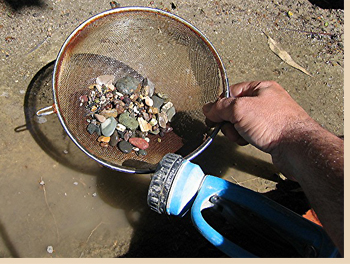 1) Put a small amount of gravel into your strainer (app. 1/2 cup) and rinse with water thoroughly.
 2) Turn or flip the clean gravel onto your search surface.
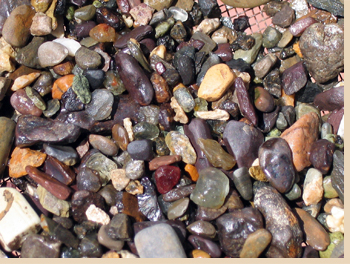
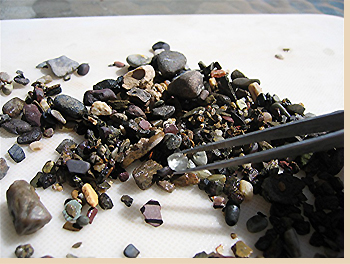 3) With your tweezers, slowly go thru small amounts of gravel looking for your sapphire. You are looking for stones that appear glass like and shiny. Sapphire can be found in all shapes and sizes (see About Sapphire Page). The sapphire may be round like a pea or have a more crystal form with straight edges. Make sure that if your gravel starts to dry out, that you give it a spray of water to give it back the wet look. If you are not sure what it is, pull it out anyway, since many sapphires are included (cloudy, fractures, not ice clean) and can sometimes fool even the most trained eye.
Method # 2
If you have to search indoors then there is another method.
Get a clear glass pie plate and a bright flashlight. After rinsing the gravel off, put a small manageable amount of the gravel in the pie place. Turn on the flashlight and shine it up from under the pie plate and look for any stones that the light passes thru. Look for glassy pieces and pieces of color. Move the flashlight around and make sure you do not have too much gravel in the plate or you may cover up what you are looking for.
2) How to Search your Yogo Sapphire Ore

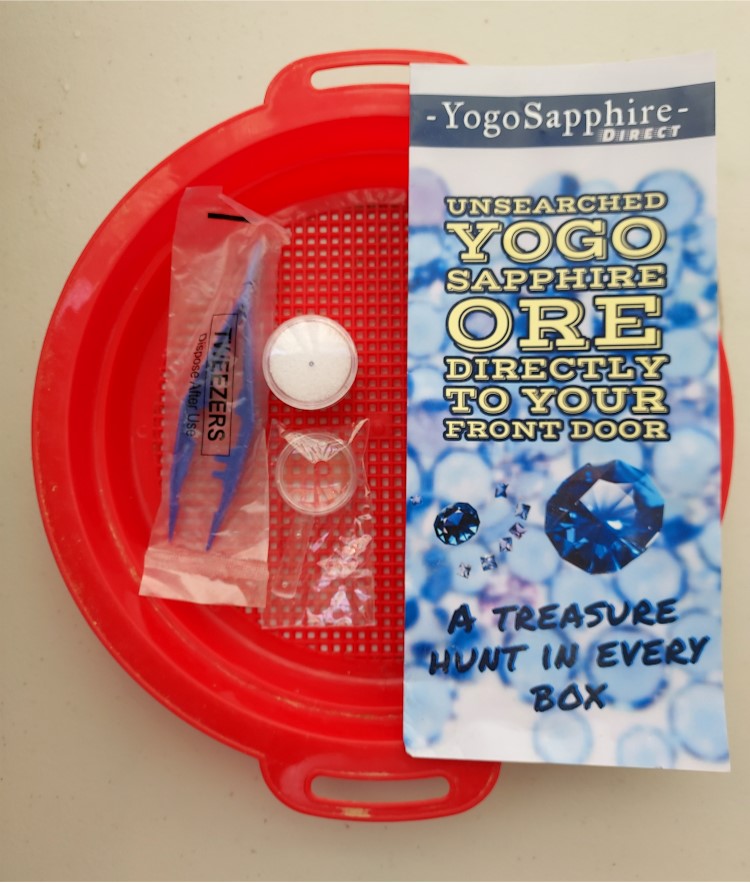
Once your box of ore arrives, open and remove the bag with your screen and goodies.
Fill your screen with ore, but not to much.
Shake out as much dirt as possible.
In a tub of water, or with a hose, wash your ore very well until most of the dirt is gone.
Once your ore is well washed, use your tweezers to begin your search! Look for blue and purple crystals, and if you are lucky, maybe even reddish colored one.
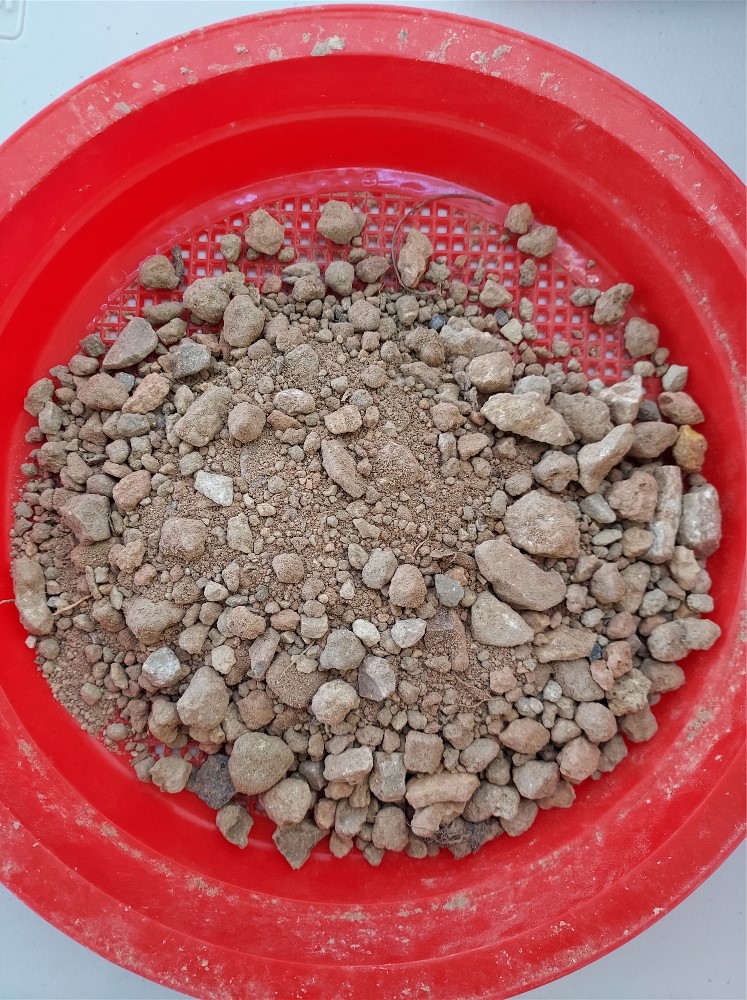
Tip for finding some sapphire you may have missed....
Since washing only removed the surface dirt, hard clay and mud clods do not break down that easily.
Once you have fininshed going through all of your ore,
place the ore into a bucket and add water to let soak for a day or two.
Then go through the ore once again, you just might get a good surprise as many have!
I found 3 more sapphire the second time around.
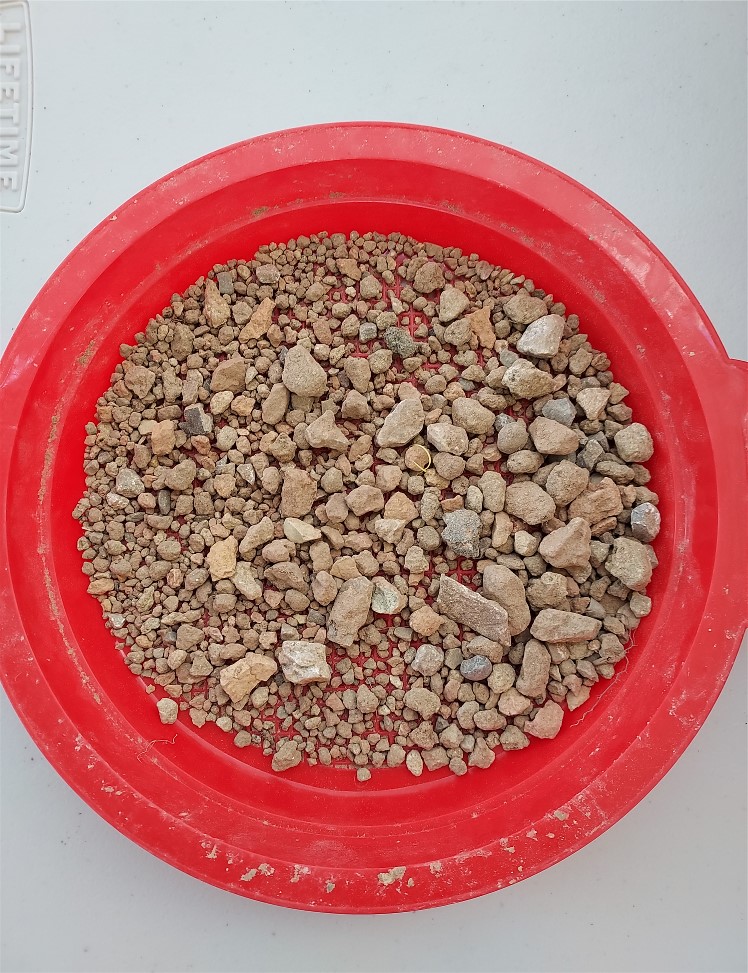
People ask me how I do it.
Everyone seems to have a little bit different method to search their ore.
When I receive my boxes, I use a set of gold classifiers / sifters
to fist sift out all the fine dirt which I save for gold panning later.
Then I separate the rock into 2 buckets, 1/4"+ and 1/4"- , it is much easier to search when the material is the same size.
Then I fill those buckets with water and let them soak for a day.
I then take small amounts and finish washing it through a screen, before spreading out to search through.
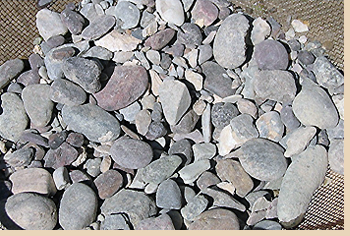
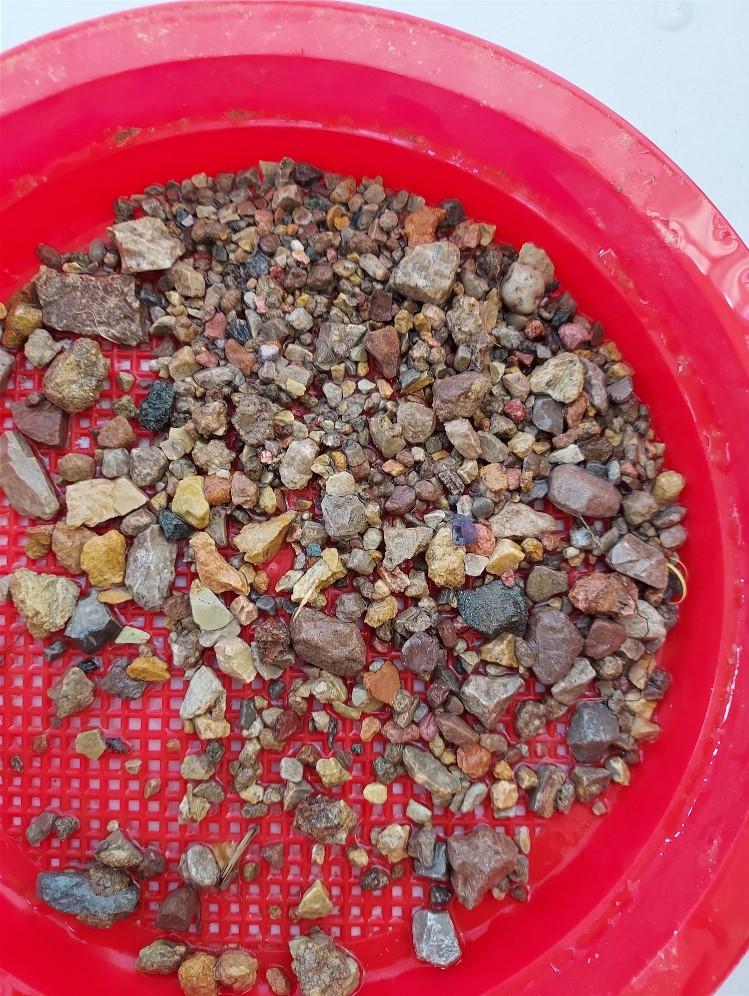
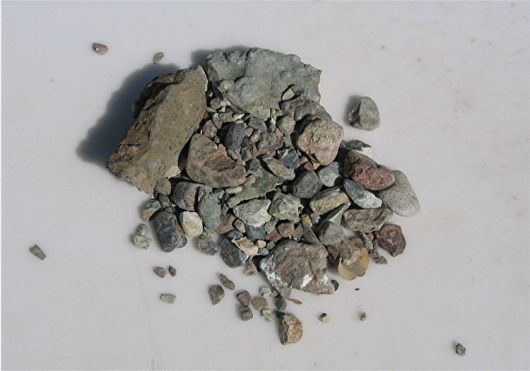
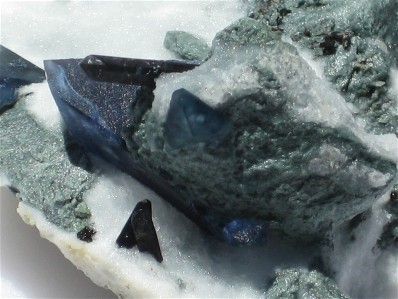
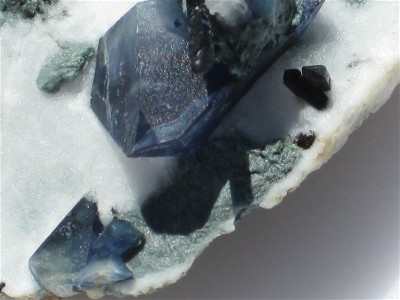
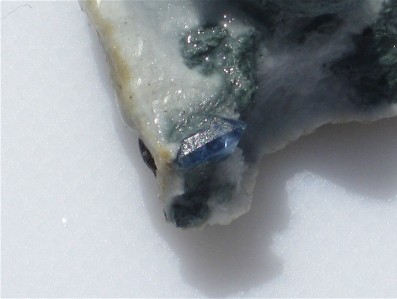
3) How to Search your Benitoite Gravel
I always take much care in order to provide my customers the best possible product, even filling each gravel order under Shortwave UV lighting to insure that there is visible signs of some type of benitoite and also to help insure that I do not ship out any creatures such as small scorpions which can be seen using fluorescence. Please understand that this gravel comes from a very remote area and nature happens, so there could be the chance of animal droppings within the gravel. So my very first recommendation when you receive your gravel, is to pour the contents onto a bucket and cover with water. Be sure to stir it around, this will allow any possible animal droppings and all plant material to float to the surface which then can be scooped out. This will also start your cleaning process and help to break down mud clods that are sure to be in with the gravel.
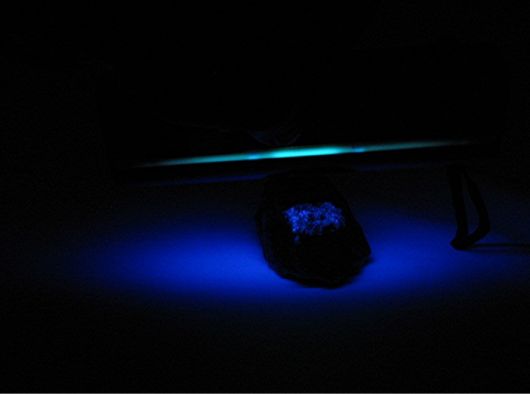
There are 2 ways to search your mine gravel, in daylight after washing the gravel or the best way to search for benitoite is to use a filtered shortwave UV light at night. It must be short wave and not your standard black light!
 Since most of the gravel is covered in dirt, you should begin by washing it first in a fine screen then turn it onto a clean surface, something white works great. It should be a fine wire screen and not a large holes strainer, as small crystal may wash thru the holes. Be sure to wash all of the dirt off and let larger mud balls soak in water in order to break up. You want your gravel as clean as possible.
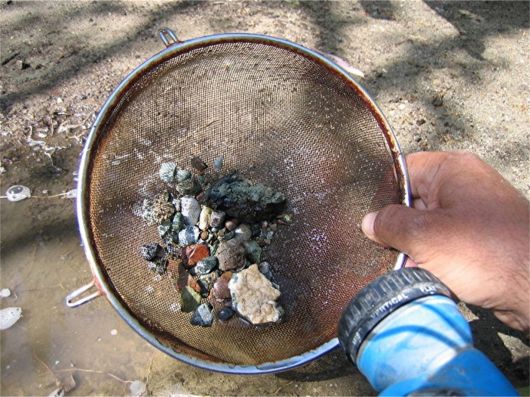 Wash everything you are going to search in small manageable amounts. Take a quick look to see if there are any obvious blue crystals, and to look for black/red neptunite crystals and any other crystals you might see.
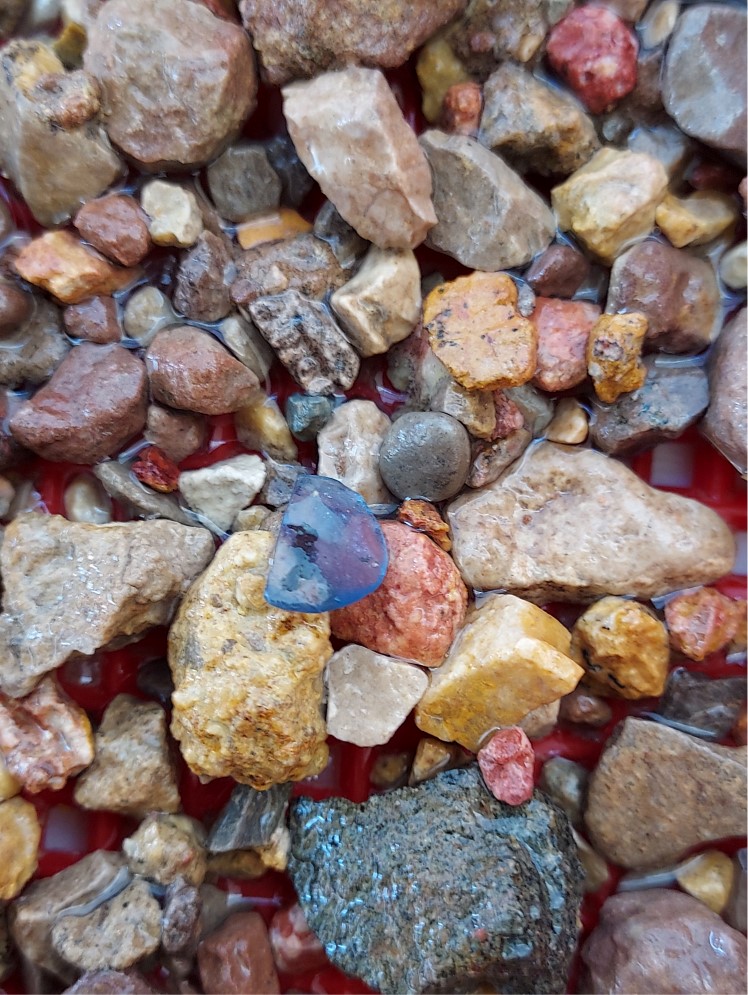
Most gem quality crystals are found in and around the white natrolite, where the heavily included crystals are found in crossite ( the blue soft stone ). Make sure to leave no stone unturned! Stones may have benitoite crystals on one side, and unless you turn it over, you may not see it. Pull out any pieces with the white natrolite on them for a closer look.
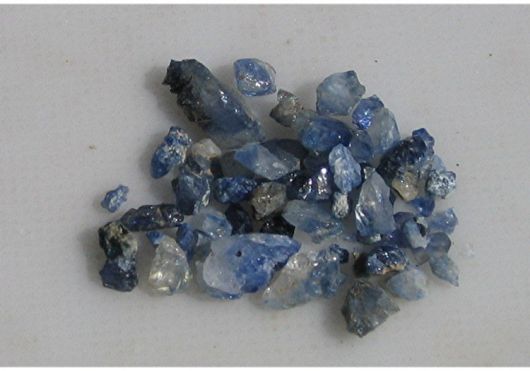 Benitoite crystals can be many shades of blue, white, clear and any combination of these, but the most treasured is blue. On very rare occasions, small pink crystals of Benitoite have been found, but this is extremely rare. You are mainly looking for blue to clear crystals.
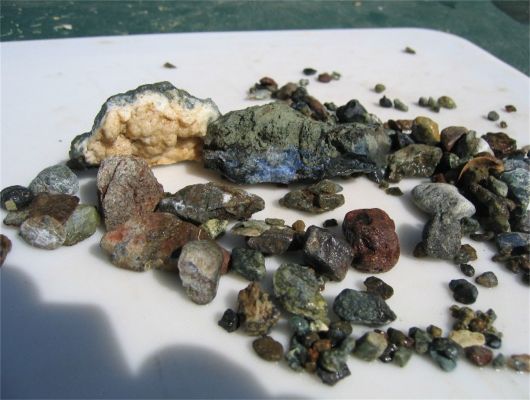 Besides looking for the blue benitoite crystals, look for white natrolite pieces and any pieces with white veins. Look carefully at these areas as it is easier in daylight searching to see blue crystals no matter how small if they are in the natrolite. The white natrolite was the last mineral to form and usually covers benitoite crystals if they are present. Even if a piece with natrolite does not show any signs, keep it for future etching potential.
Except for floaters ( loose crystals ), most crystals of any type are at least partially incased in either natrolite (white) or crossite / blue schist (which is the blue / green color stone that it is found in). Once you have searched during the daylight, save to rest to run the UV light over.
Before you start your search using a shortwave UV light, make sure that the gravel is well washed. The dirt and clay from this region can be pretty tough, so the use of an old toothbrush or small scrub brush will help. Ultraviolet light does not penetrate the dirt so you might have a nice piece of Benitoite and not even know it. Also, once you start to do your UV searching, make sure to place the gravel on something dark. I have painted a piece of plywood flat black, this makes it much easier to see the fluorescence by reducing the amount of UV light reflected back at you.
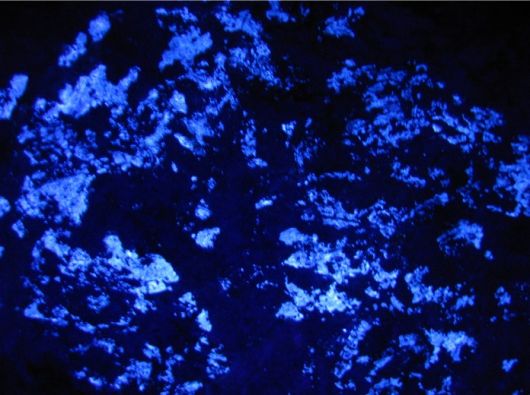
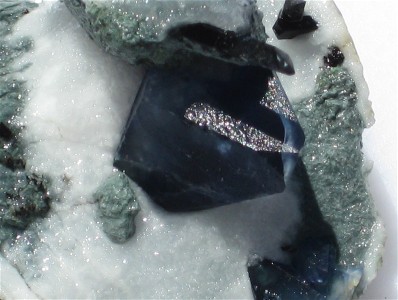
The shortwave UV light is the only way to make sure that you found it all. I have found the gravel has a lot of included specimen crystals that are a steely blue/gray color and are easily missed in daylight searches. If you look at the photos on this page and on the Benitoite page, you will see examples of the different types of crystals. The heavily includes triangular shaped crystal is about 1 inch in size, it was missed during the day light search, while the UV light picked it right up.
We now have small inexpensive "filtered" 4 watt shortwave lights for sale, please see our Home Mining Supplies page. These shortwave UV lights are pretty good for close inspection, since they are small, about 6 inches long, you have to hold the light within a few inches of your rocks and are adequate for small searches. If you think that you might search for benitoite often or are interested in collecting fluorescent minerals, then a stronger / larger electric shortwave UV light would be suggested.
Warning about using Shortwave UV.... Although the small 6 inch version of this light emits a small amount of shortwave UV compared to the output of a larger electric display light, it is recommended not to stare into the lamp directly. Extended direct viewing of the light directly into your eyes can cause photokeratitis (welders flash) which is sunburn of the eyes. Protective UV blocking safety glasses should be worn whenever using Ultraviolet light products.
If you find pieces that have crystals incased in natrolite or crossite, these can be cleaned and etched to expose the crystals even more, or to expose crystal that you did not even know were there. You can etch them with muriatic acid. This softens the natrolite and crossite allowing it to be brushed away, but if you intend to go this route with any sample, read instructions carefully to see how to do it properly or you could destroy your specimen. Here is a link to an article from an expert in the field on different mineral cleaning methods, "Mineral Cleaning for Beginners" . Here is an article by an expert on the "Cleaning of Benitoite Specimens". We hope these will help guide you.
4) How to Clean / Etch a Benitoite Specimen
The following instructions are intended to assist with how to properly etch a benitoite specimen. This is not the only method used, but a close variation on the methods used by many, and what has worked well for me. I prefer the natural matrix look, so I do not trim any of the specimens I work with, as long as the size is easily manageable.
List of items you will need:
- Plastic storage containers in different sizes, like Ziplock or Tupperware
- Muriatic acid, for 10 to 1 etching solution
- Rubber gloves
- Safety glasses
- Gallon plastic container for mixing and storing acid solution
- Paraffin, candle wax
- Small artists paint brushes for wax application
- Hot plate or camping stove
- Dental picks
- Old toothbrush
- Small pot for wax melting and or wax removal
Items you may also want:
- Porcelain coated or stainless steel pot
- Sodium hydroxide / Pure Lye (drain cleaner)
- Distilled water
When you find a nice specimen that you wish to etch, you should always approach the etching process like you are about to create a piece of art. Taking your time and not rushing is key to properly etching a specimen. I have etched a small specimen in about 8 hours, and I have also spent 2 months etching a specimen. Remember that once you remove something, you cannot put it back. Dissolving away too much natrolite or scraping away too much of the matrix, can and will destroy the look and appeal of a specimen. You may not get it right the first time, or even the second, but after etching a few pieces, everyone finds what works best for them. Believe me, I have destroyed or damaged a few, what would have been nice specimens, simply because I did not take my time.
If you are just after crystals for facet rough, then that is a different matter entirely, this guide is to help those who wish to properly etch a mineral specimen.
Please do not worry, the acid and water solution will not have any effect on the crystals, only the natrolite and schist.
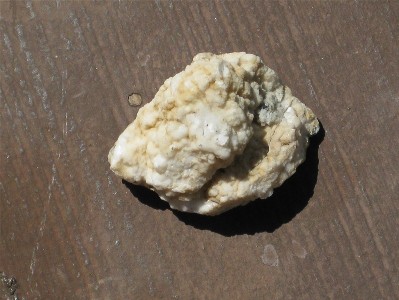
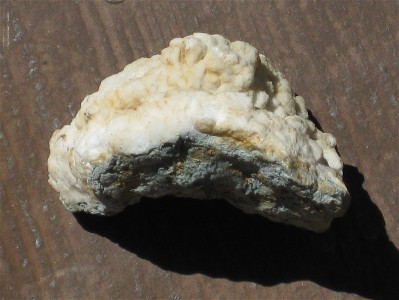
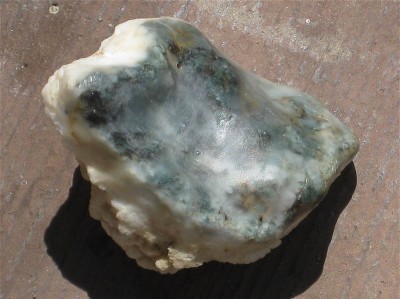
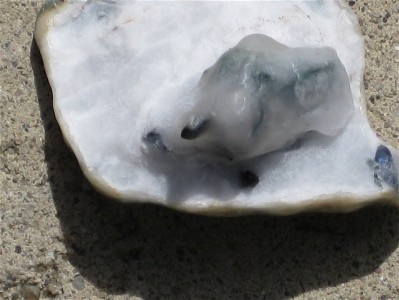
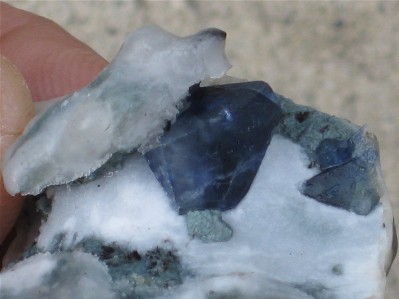
I have chosen a small piece of natrolite covered schist to etch for this guide, the piece is approx. 3 inches in diameter before etching begins. Here are two photos of the specimen I selected. It was washed with water, and also cleaned with a cleaning gun, to remove as much dirt as possible. It had no fluorescence at all, but showed good potential with the amount of natrolite present and it's lumpy form (usually indicating that it may be covering something).
First, I waxed the entire area of schist on the bottom, (wax protects an area from the effects of the acid mixture to be used). You want to get your wax as hot as possible, this helps it adhere to the specimen and fill in any small gaps. So if there is an area you do not want etched, cover it in wax. If you have exposed crystal, you may want to wax over them or around them so the etching process does not loosen the surrounding matrix. If you over wax an area, not a problem, it can always be removed later. (You can use just about any form of candle wax. I buy blocks of candle wax from the local craft store, melt it and brush it on using paint brushes. I also have a small Coleman camping stove outside where I do all my etching, just for waxing and finishing).
During the coarse of your etching, you may want to remove the wax to inspect your progress or to uncover an area that the wax covered too much. To remove wax, fill a pot partially with water and slowly heat the water. As the temperature rises, the wax will start to melt. Just when the water reaches a slow boil, remove the pot from the heat and allow it to cool to room temperature. It is very important not to rush the cooling, if you do you can damage crystals. Make sure to let dry and rewax areas you want to protect before continuing to etch.
Now before you begin etching, you need to pre mix your etching solution using 10 parts water to 1 part muriatic acid in a plastic container that can be tightly sealed. You should be able to purchase muriatic acid at your local hardware store or pool supply store.
Be very careful when using muriatic acid, it will not only burn your skin, but the fumes can be fatal, so use safety equipment. Make sure to always add the acid to the water and not the other way around to avoid splashing. Once you have made your 10 to 1 solution, it will be very easy to handle since it is diluted.
Mix up enough solution to use for a while. I usually mix up about 3 gallons at a time, but I do a lot of etching. Do not attempt to make a stronger solution. If you do, it will be harder to handle and will etch your specimen too fast, removing too much natrolite too quickly. You will also need a small plastic container to put your specimen into with the solution. Not too big, but big enough for the solution to completely cover the specimen. I like the reusable plastic storage containers you can find at most any store.
Do not worry, the acid and water solution will not have any effect on the crystals, only the natrolite and schist.
I then place the specimen in the plastic container and add my etching solution, enough to cover the specimen completely and let is set for one hour for it's first soaking.
After the first hour, I take it out and give it a quick rinsing with water and look it over to see if there are any signs of any type of crystals. I repeat this step about every hour or so. Nothing is showing, so I decide to let it soak over night. (Be careful when soaking over night, you can easily remove to much natrolite if the layer is thin. Many times I will take a specimen out of solution over night and what until morning to begin again, so I do not remove to much natrolite).
In the morning I take the specimen out of the solution and wash it off. A lot of natrolite was removed and I was lucky that it did not remove to much, but the layer was thick so I was not too worried. This is also the perfect time to change the solution in your container for some fresh solution. Always change your solution on at least a daily basis. Do not allow your solution to start to gel. If it gets to this point, the etching process has stopped. Also, your solution over time may turn yellow, this is also a good indicator that it is too old and needs to be changed.
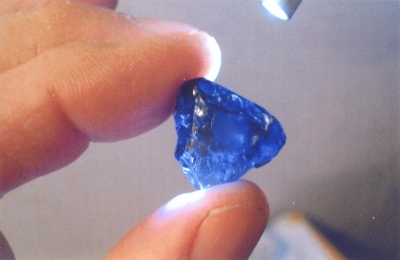
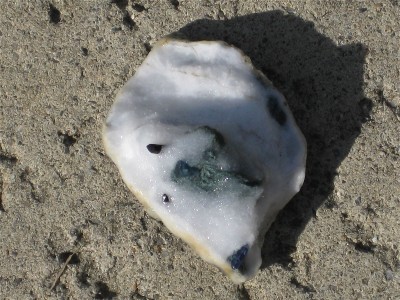
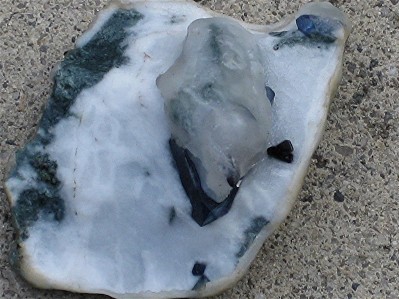
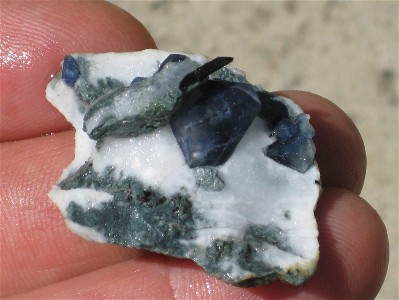
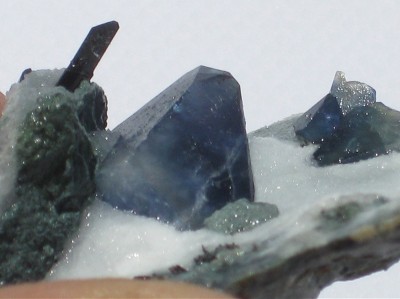
Notice in this photo, there are 2 terminated ends of neptunite crystals just starting to show and 2 small benitoite crystals showing. I thought I would have seen some larger crystals at this point, but I see that the large lump near the center of the specimen was apparently some of the schist, but it appears that the neptunite at the top may be coming out of the schist and the benitoite sitting on this lump is almost fully exposed. I will want to protect the two exposed benitoite crystals so the matrix won't get dissolved away, but the neptunite need to show more of itself. I now let the specimen dry so I can add more wax.
Here is the specimen with the wax I added to the 2 benitoite crystals that were showing. I covered the center crystal along with the exposed shist and the lower benitoite crystal, I left one edge unwaxed so that edge could etch more. After the wax is added and dried, I put it back into the solution for another soaking. Now that the layer natrolite is getting thin, I will have to watch it more carefully. About every hour I will take it out of the solution, wash it off with water, and then examine it.
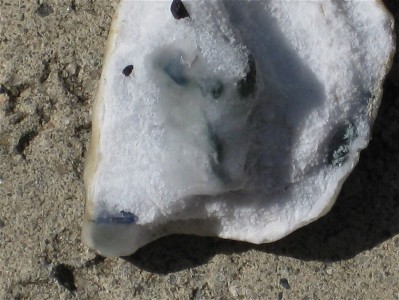
After another 3 soaking cycles, ( the cycle is soak, remove & wash then inspect), you can see in this photo that the neptunite crystal on the top is as exposed as I want it to be, so I will have to add more wax to this area. Also, hard to see in the photo, but there is a small cross of two neptunite crystals near the bottom of the photo starting to appear. I will leave these neptunites uncovered so that they are exposed more. There is also some blue beginning to show at the base of the center lump. I must make sure not to wax this area so the benitoite can be exposed. So again, I must let the specimen dry off in order to add more wax.
As you can see in this photo, I have added more wax to the top of the piece to cover the exposed neptunite. After the wax dries, back into the solution.
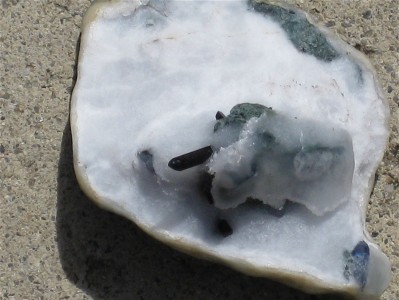
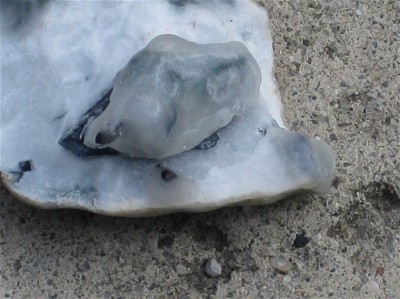
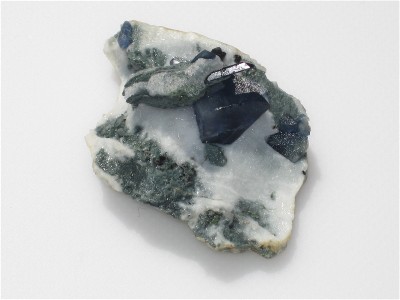
After about 3 more soaking cycles, I see that the crossing neptunite crystals have been exposed enough, and a new small benitoite is starting to appear at the bottom of this photo. I do however get a big surprise! Under what had appeared to be just a mound of schist near the center of the specimen, is a very large benitoite crystal showing at least one perfect termination under the center area I had waxed. After the first day of etching, I thought this specimen would only have small crystals. I am glad I was wrong.

At this point I want to wax the neptunite crystals and only a small portion of the large benitoite so to expose more of the crystal. So after applying the new wax and letting it dry, It is going to be another over night soak. Hopefully the morning will bring more good news.
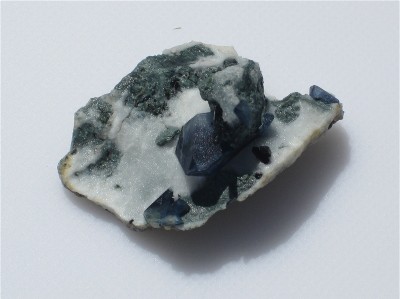
The next morning, after taking the specimen out of solution and washing it off, well here are 2 photos of what I saw.
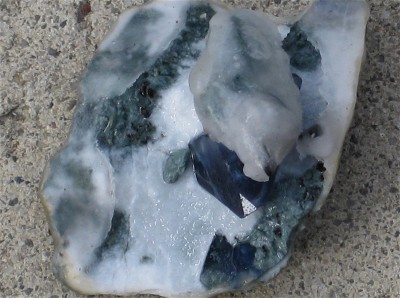
The large center benitoite crystal is beautiful and gem quality. The single benitoite crystal near the bottom of the photo, had a another next to it. With the natrolite layer getting very thin, I think I have etched this as far as I want to. I will have to now remove the wax to be sure. Before I do, I will carefully scrap down some of the matrix that is loose or not appealing. I will then put the specimen in a pot of water and heat to a slow boil, to remove as much wax as I can to see if this is the end of the etching process for this piece. After bringing to a slow boil I will now let the pot sit until the water is near room or in this case outdoor temperature, before I remove it from the water.
While you are etching, sometimes a crystal may have to be removed or sacrificed for the sake of the specimen. I always try to remove broken crystals. Sometimes, small neptunites are just to fragile and will break off while working with the specimen. This should be expected. As you may notice with this specimen, as I was working it, a few small neputunites did appear. They were just to fragile so they had to go, that is why I did not mention them.
Here is the almost finished specimen. Almost all of the wax has been removed. The specimen has spent the past few days soaking in a mild acid solution. Just washing it with water will not remove all the acid that has seeped into the specimen and over time your specimen can turn yellow in spots. On pieces that have not soaked for long periods, a soaking in water and baking soda can neutralize the acid. After soaking in the baking soda water for about a day, remove and wash it off and let dry.
The best way to finish this specimen off, is a lye bath. This is a very dangerous step and must be done very carefully. Make sure to wear chemical gloves and a face shield at all times during this process. If you wish to attempt this step, please contact me and I will give you the instructions on how to give your specimen a lye bath. The lye bath will also neutralize any remaining muriatic acid, and will help finish cleaning the crystals. Finally, rinsing the specimen off using distilled water will help stop dried minerals from appearing on your crystals.
Here are photos of the finished specimen. It took about 3 days to etch. It now measures approx. 1 3/4 inches by 1 1/4 inches. The center benitoite is approx. 1.6 cm and shows perfect teminations.
Well, I hope all this information helps. I think this helps demonstrates just why beautiful specimens cost what they do. Beside the rarity of benitoite, the time and effort needed to properly etch a nice specimen can be great.
If you have any question, please send me an email.
This specimen will be available for sale shortly on the Benitoite Specimens page in our store.
Update: This specimen is now sold. It sold for $750.
